All courses of our school are available with all options
Video only, Intensive with support, Individual.

Hello, dear friends and colleagues.
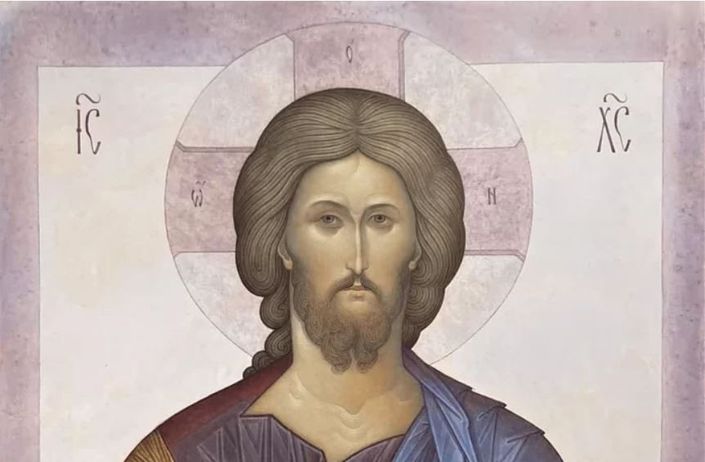
My name is Anthony Gunin, I'm an orthodox priest and iconographer. Welcome to my first icon painting course, which is dedicated to the creation of the icon of our Lord and Savior Jesus Christ type of Pantocrator.
You will see the whole process of painting from the beginning to the very end and I’ll be with you with my hands and explanations. The whole course lasts a total of about 25 hours and includes 7 thematic lessons that cover transferring the image to the icon board, applying the basic color spots, outlining and shading Jesus' garments, highlighting them, painting the body parts and the hair, making assist and writing text on the Gospel pages and, at last, titling the image.
You can watch fragments of the course lessons on our YouTube channel
https://www.youtube.com/channel/UCsEkrK2TAUSgl5gkCDBA9OA/videos
Please subscribe to receive updates on upcoming courses
These 7 lessons are divided into 45 parts, approximately 30 minutes each, so if you decide to participate in our classes, be patient and allow enough time for study. If you acquire the course with feedback, I will watch your progress, comment on your works and answer your questions in a secure Telegram chat for two weeks from the start of your studies. I want to warn you, this course is not for beginners, it requires some experience and basic painting skills from participants.
So may God help us and let’s go.

List of necessary instruments and materials for the course "Pantokrator" used by Anthony Gunin Iconography.
- The gessoed icon board or other type of basis for icon (gessoed MDF or ampersand). Adviced approximate size - 12.5"x 9.5".
Paints.
- Pigments: golden ochre, titanium white, lapis lazuli, french vermilion.
- Watercolors: ivory black, alizarin crimson, cobalt blue hue, cadmium yellow.
Brushes.
- Round №: 5, 3, 0, 0/3, 0/18.
- Filbert №: 8, 0.
- Flat oval №: 8.
Stuff.
- Automatic pencil with hard graphite (4H)
- Half round scalpel
- Dropper
- Palette or several small cups for paints
- Conteiner for egg emulsion
- Conteiner (usually glass) for water
- Piece of some soft material under hands
Egg emulsion.
- Egg emulsion medium: egg yolk (1 part), water (2 parts), white vinegar (1.5 parts), several drops of gallipot mastic. I use Mastixfirnis by “Schmincke”. But it is not necessary, you can easily replace it with dammar varnish, which you can purchase in every art store. The adding quantity is the same - about 3-4 drops on 50 ml of emulsion.
Stuff for making golden assist.
- Book of gold leaf loose
- Special prepared suede pad
- Double-edged gilding knife
- Lampenzel
- Cotton discs or pieces
- Chalk
- Lubricant for lampenzel
- Jar with wort (suslo)
Required files are attached to Lesson 1. Part 1 - Supplement_proris.jpg, Pantocrator_negative_model.jpg
Course Curriculum
- 2.1 - The second flat-lay. Applying the first primer ochre layer and its intensification on the certain spots. Putting the color linings under the basic color spots of the image. (34:37)
- 2.2 - Making and applying the basic colors of the background, chiton and himation. (29:28)
- 2.3 - Refining the silhouettes of the applied spots. Making and applying the colors for body and golden parts, pages and sides of the Gospel. (29:07)
- 2.4 - Mending and fixing holes and bald spots on the colored surfaces. (31:58)
- 2.5 - Making and applying the basic colors of Christ’s hair and halo. Mending of these spots. (26:04)
- 4.1 - Making and applying a negative layer for future highlights on Christ’s chiton and himation. (21:41)
- 4.2 - Painting the highlights on chiton. (47:27)
- 4.3 - Glazing and future refining chiton highlights. (23:04)
- 4.4 - Painting the highlights on himation. (52:33)
- 4.5 - Continuing with the highlights on himation. (25:44)
- 4.6 - Continuing with the highlights on himation and glazing it. (38:23)
- 4.7 - Refining the highlights on himation. (26:42)
- 4.8 - Finishing the highlights on himation. (37:51)
- 5.1 - Preparing and painting the shadows on the body parts. (33:00)
- 5.2 - Smoothing and perfecting the shadows on the Holy face. (29:01)
- 5.3 - Perfecting the shadows on the hands. (29:48)
- 5.4 - Making and painting the first layer of highlights on the body parts. (37:23)
- 5.5 - Painting the second layer of highlights on the Holy face. Perfecting it. (33:37)
- 5.6 - Painting the second layer on the hands. Glazing the body parts. (38:56)
- 5.7 - Refining the details on the Holy face. Outlining the Facial features and adding some extra cast shadows. (23:30)
- 5.8 - Applying the lightest accents and making the rouge blush on the body parts. (33:14)
- 6.1 - Painting Christ's hair. Applying the first and the second layers of highlights on it. (37:05)
- 6.2 - Painting Christ's hair. Applying the first and the second layers of highlights on it. Other side. (19:38)
- 6.3 - Glazing of the hair. Painting of the accents on the strands of the hair and finally glazing it. (31:25)
- 6.4 - Contouring and making shadows of the hair. (26:04)
- 6.5 - Contouring and making shadows of the hair. Continuation. (25:09)
- 6.6 - Continuing painting the hair shadows. (35:14)
- 6.7 - Continuing painting the hair shadows. Final part. (35:38)
- 6.8 - Painting the Christ’s beard. (43:52)
- 6.9 - Continuation of the beard painting and increasing its volume with dark accents. (37:35)
- 7.1 - Correction of the pages of the Book. Painting of the edges of the Gospel paged. Glazing and perfecting them. (25:39)
- 7.2 - Painting the letters of the text on the Gospel pages. (27:29)
- 7.3 - Painting the letters of the text on the Gospel pages. Continuation. (33:33)
- 7.4 - Continuation of painting the letters. (30:00)
- 7.5 - Continuation of painting the letters. Final part. (30:49)
- 7.6 - The third flat-lay. Making the golden assist on the clavius. (26:04)
- 7.7 - Correction of the golden assist rays with paint. Applying the wort for the assist to the edges of the Gospel cover. (26:44)
- 7.8 - Gluing gold to the Gospel cover edges and correction of the assist. (33:53)
- 7.9 - Outlining the halo and the cross on it. Painting the Greek letters on the parts of the cross. (40:04)
- 7.10 - Signing the ready icon with the abbreviation of Christ’s Name. Making the color edge along the perimeter of the icon. (38:39)
You can choose from the four options:
1. Video only. In this case you pay $ 300 and work on one's own.
2. Feedback. If you have already bought Video only, you can get access to Intensive by paying an additional $ 200.
3. Intensive. For $ 500 you get access to video tutorials and comprehensive support from instructor fr. Anthony Gunin. Two weeks of phased intensive classes with a check of your work in close individual chat in Telegram. You post photos of your work on it's each stage, ask questions and receive detailed answer with recommendations from fr. Anthony. 1 hour in a day you can get any advice. On the each stage of work requires a limited time (about two-three days).
4. Individual training. For $ 800 you get personalized online training from instructor fr. Anthony Gunin without time limits. Сlasses at a convenient time for you with a check of your work in close individual chat in Telegram, videocalls if needed. Obligatory completion to the final result.
Receipt of payment for the course goes to your email automatically.
Access to the video for those who paid for the course is not limited in time. The course is in English, in the player you can find the subtitles function (also in English). To switch it on you need to push the button CC and choose "English".
This is a complicated work, that's why if you will not dedicate it enough time, you can't complete it by the two weeks. If you're unable to finish your icon for some reasons, at least you have an opportunity to get skills for completing work. Although it should be enough time for these two weeks for it, provided your intense everyday work.
Moreover, after finishing course you have an opportunity to get separate consultation ($ 70 per hour) with the instructor according to your wish and his possibility.


